Metal window-mounted series
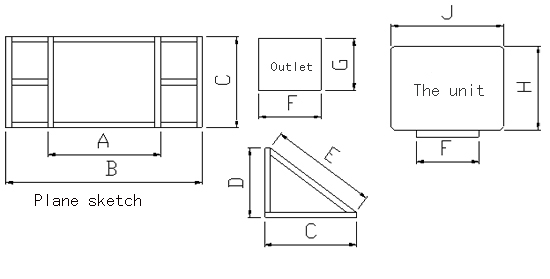
| Code Name | A(cm) | B(cm) | C(cm) | D(cm) | E(cm) | F(cm) | G(cm) | H(cm) | J(cm) |
| JH06LM-12S1(S6) | 61 | 120 | 51.5 | 40 | 60 | 35 | 28 | 46.5 | 60.5 |
| JH06LM-12S1(S8) | 81 | 140 | 65.5 | 50 | 77 | 44.8 | 36.8 | 60.5 | 80.5 |
Plastic series
| Code Name | A | B | C | D | E | F | G | H | J | K | O | P | Q | I |
| JH18AP-31D1(A-2) | 95 | 15 | 85 | 124 | 20 | 85 | 110 | 64.2 | 95 | 150 | 140 | 92 | 160 | 170 |
| JH18AP-31S1(A-2) | 95 | / | / | 75 | 30 | 85 | 110 | 64.2 | 95 | 150 | 140 | 92 | 160 | 170 |
| JH18AP-31D1(A-2) | 90 | 15 | 85 | 124 | 20 | 90.5 | 101 | 64 | 95 | 150 | 140 | 94.6 | 160 | 170 |
Metal Big air flow series
| Code Name | A | B | C | D | E | F | G | H | J | K | O | P | Q | I |
| JH25AM-31D1 | 130 | 15 | 95 | 145.5 | 30 | 123 | 119.2 | 76 | 95 | 180 | 170 | 124 | 190 | 200 |
| JH30AM-31D1 | 130 | 15 | 95 | 145.5 | 30 | 123 | 119.2 | 76 | 95 | 180 | 170 | 124 | 190 | 200 |
1. Check up and adjustment before operation
Is the cooler installed horizontally?
Is drain pipe connected to the machine?
Is the water supply leaking?
Adjust water level in the sump?
Is the power supply connected correctly (particularly for three phase machine)?
Is the power line for the control panel correctly connected?
Is the operation current within the rated range?
Is there unwanted object in the vent?
Is the voltage correct?
Does cooler vibrates noticeably while operating?
Are there any foreign objects in the sump?
2. Important notes
The best effect is achieved when the unit is used in a well ventilated and dry place, where the unit takes in 100% fresh air from outside and no re-circulation occurs.
Avoid discharging cool air into a closed space. There must be enough space for discharged air, even use exhaust fans
For a place without powered exhaust, 0.8m2 of exhaust area is needed for every 3600m3/h air discharge. When using a powered exhaust, the designed exhaust volume shall not be less than 85% of air intake.
Keep the unit away from welding sparks or any source of fire during the installation and when the unit is running.
The unit must be tested and adjusted. E.g.: adjusting water level floats before operation. Ensure that the unit is operating within the rated electrical currency.
Ensure correct wiring of the power and controller. The section in the power socket shall not be less than 1.5mm2. The units shall use a dedicated power line instead of sharing a power line with other equipments.
Voltage of power supply shall be within 10% vibration from the rated voltage. Lower voltage may cause motor start failure or undue frequent starts and stops. Long-term low voltage or high voltage will cause damage to the motor.
The controller and its wire shall be kept away form strong electronic and magnetic interference, such as frequency converter, silicon speed and temperature controller, high frequency heater circuit or high power motor. Avoid wiring the power supply lines parallel to these sources. In the case of unavoidability, the power line must maintain a distance of more than 30cm from parallel interference source.
3. Inspection and preparation before
(1) Check the components and documentation (e.g.: instruction, certificate and maintenance card) against the packing list. If there in anything missing or damaged, keep it as it was and report to the factory or local distributor.
(2)Check the power supply for correct voltage.
4. Operating Instructions
Installing the castors:
Locate the casters inside of the cooler and attach them to the cabinet bottom. Start all bolts into nuts before tightening. The rigid casters mount at the front and the swivel casters mount at the back.
Connecting the water:
Move the cooler to an area where it can be filled with water and drained. The cooler should be located on horizontal ground. Connect to a water supply using a commercial grade garden hose connected to the adapter on the float valve and turn on the water. Verify water tight connections by visually examining both the float/hose connection and drain plug.?
Turn on the water supply to the cooler. The hose connection to the float valve provides an automatic method of refilling the water supply as water is evaporated.
For best results, turn the pump on a few minutes before turning on the blower fan. This allows the cooling pads to pre-wet best efficiency.
Whenever possible operate the blower fan at low speed for maximum cooling. When cooling is not required you can operate the unit as a fan only by turning on the blower fan and leaving the pump turned off.
The water can be adjusted by tightening of loosening the clamp that pinches the water supply tube. Adjust the water flow clamp so that adequate water is supplied to the aspen pads without excess water splashing out of the trough during normal operation.
5. Electrical diagram
Please refer to the sticker under the control box cover
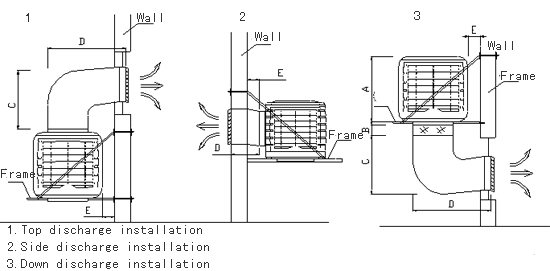
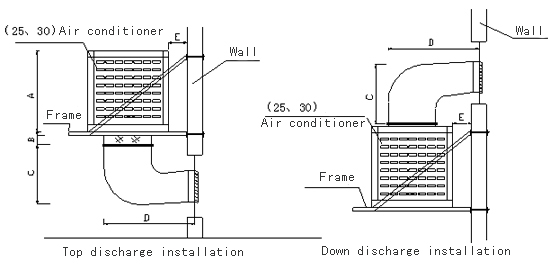
6. Location of evaporative air cooler
Always make sure the unit is operated on a horizontal surface. When using the cooler indoors, the best location for it is near a partially opened window or door where hot outdoor air can be drawn into the unit. The Mobile Model is portable but use caution when rolling the unit to avoid splashing and spilling of water. Cool air can best be directed through the space by using a partly opened window or door, ideally one that is situated on the opposite side of the space from the cooler. This allows the cooled air to be moved through the space and exhausted back outdoors which is critical to proper operation of the cooler.
